![[인프런 워밍업 스터디 클럽 2기 FE] 1주차 발자국](https://cdn.inflearn.com/public/files/blogs/b301fec9-91c7-45b1-b4c6-31973ba239e1/334820.png)
[인프런 워밍업 스터디 클럽 2기 FE] 1주차 발자국
1주차
JavaScript와 React를 더 공부하고 싶어서 워밍업클럽이 좋은 기회라고 생각해 신청하게 됐다. 혼자 하는 것보다 여러 명이 함께하면 더 동기부여가 되기 때문이다. 커리큘럼을 봤을 때 회사와 병행하기에 빡빡하다고 느꼈지만, 10월에 휴일이 많아 완주할 수 있을 것이라 생각했다. 막상 해보니 예상보다 빠듯하지만 완주를 목표로 하고 있다.
학습 (자바스크립트 A-Z 섹션 2~6)
자바스크립트 기초를 다시 학습하면서 몰랐던 부분이나 대충 알고 있던 부분들을 확실하게 짚고 넘어갈 수 있었다. 특히 섹션 5가 재미있었는데, 구조 분해 할당, Intersection Observer를 사용한 lazy-loading, 커링 함수 등 새롭게 접한 개념들이 좋았다.
미션
미션 전체 코드는 깃허브에 올렸습니다.
01 음식메뉴 앱
GitHub : 01-food-menu
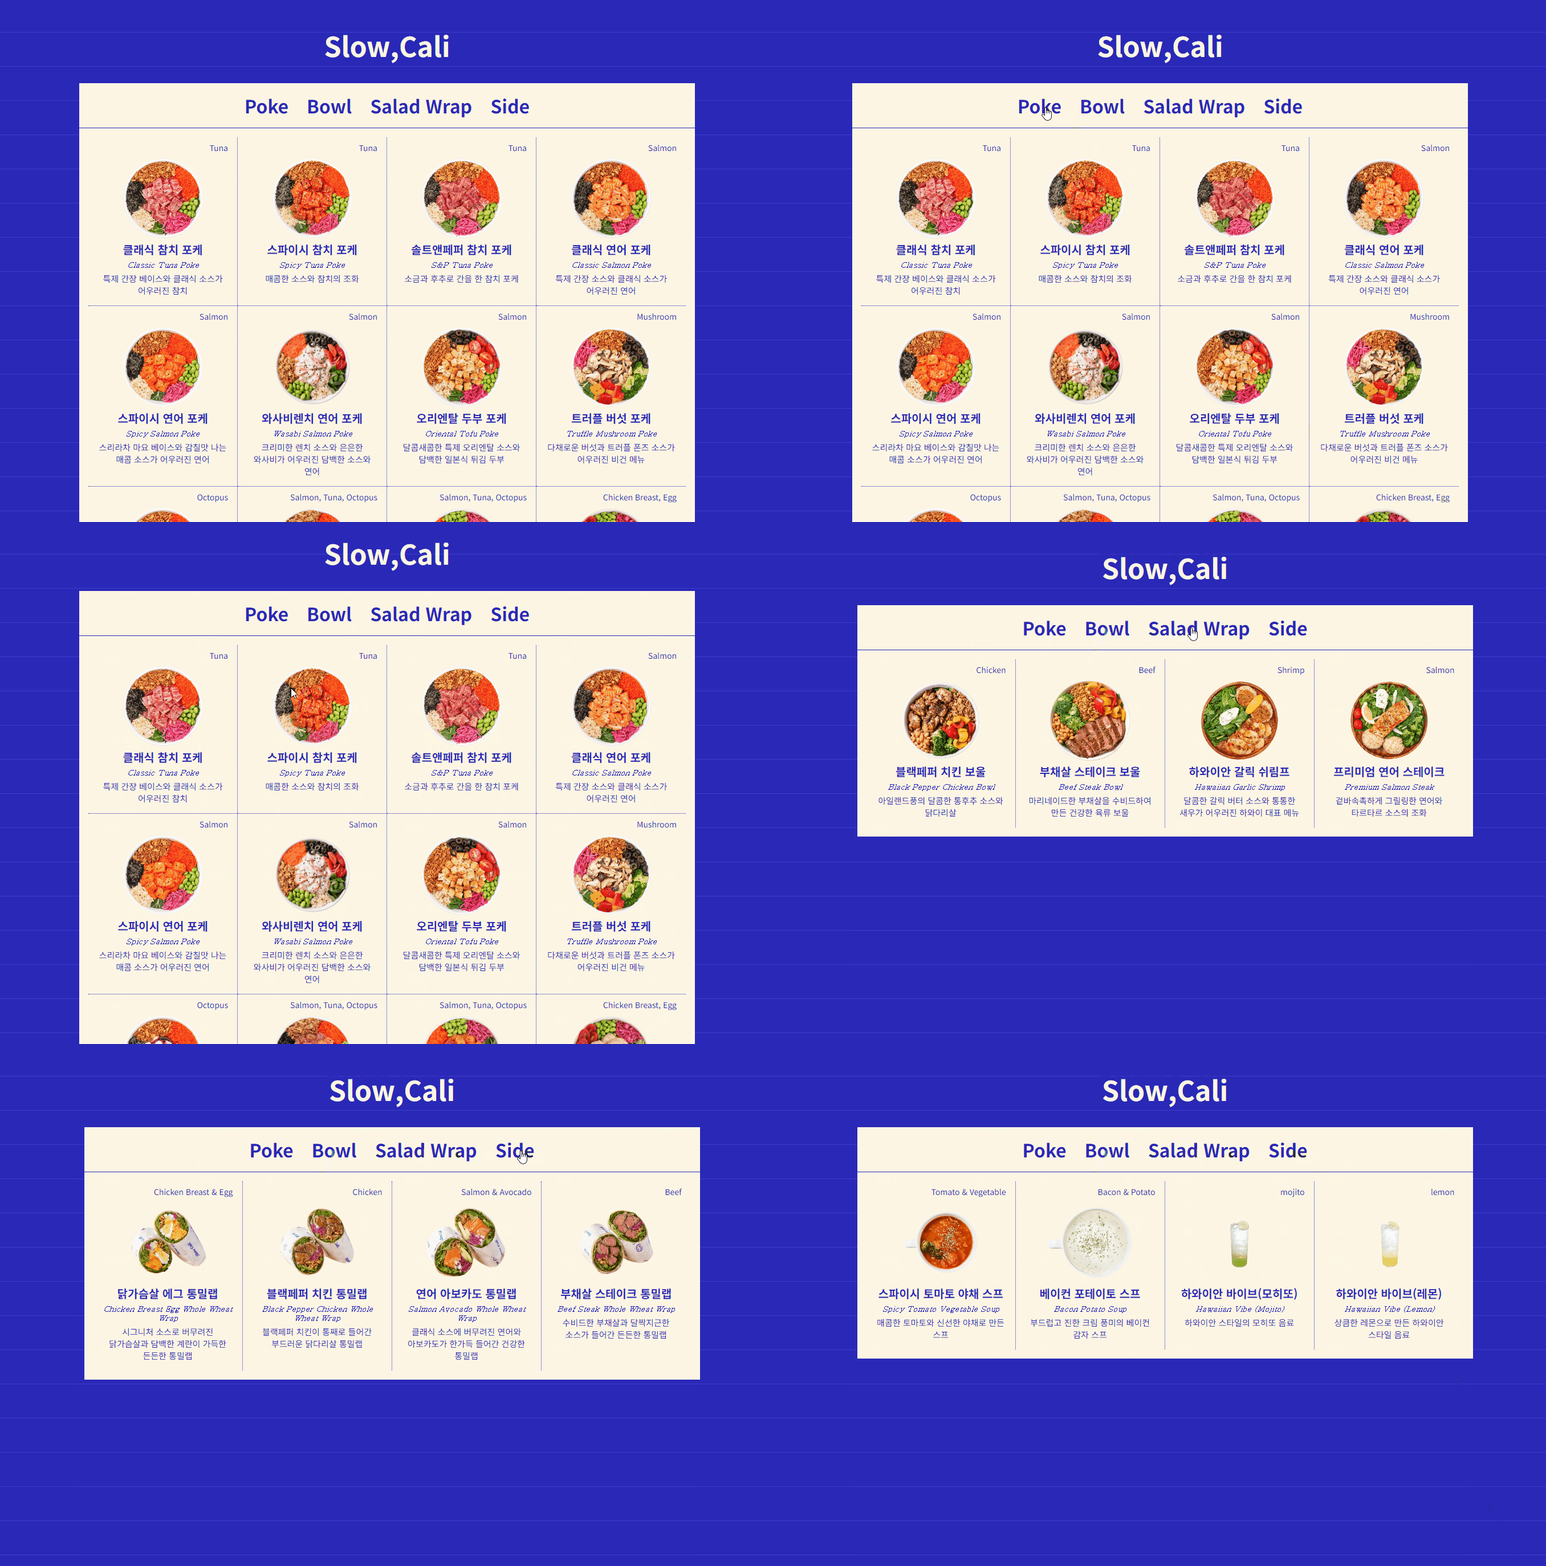
개요
객체 및 DOM, Event 다루기
필요한 기능
각 카테고리별로 메뉴 항목을 HTML 요소로 동적으로 생성하여 추가
탭을 클릭하면 활성화된 탭의 메뉴를 보여주기
초기 상태에서는 첫 번째(0번째) 카테고리 메뉴를 기본으로 보여주기
구현
data.js 파일에 필요한 데이터 정리
 poke: [
    {
      name: '클래식 참치 포케',
      englishName: 'Classic Tuna Poke',
      mainIngredient: 'Tuna',
      description: '특제 간장 베이스와 클래식 소스가 어우러진 참치',
      img: 'https://www.slowcali.co.kr/data/file/main_menu/3b25130ffa2b782b388a0db95e8c1b6f_ofB4aSuQ_855bd95ad4a7a0acd9c9e0d2ca708eab2b96d5cf.png',
    },
...
예쁜 메뉴판을 만들고 싶어서 슬로우캘리 홈페이지에서 메뉴와 이미지를 가져다 사용했다.
const categories = ['poke', 'bowl', 'wrap', 'side'];각 카테고리를 설정하고 forEach를 사용해 메뉴 생성하고 탭 클릭 이벤트를 준다.
.tab-content {
  display: none;
}
.tab-content.active {
  display: flex;
}
// 탭 클릭 이벤트
function handleTabClick() {
const tabItems = document.querySelectorAll('.tab-item');
const tabContents = document.querySelectorAll('.tab-content');
tabItems.forEach((tab, index) => {
tab.addEventListener('click', () => {
// 탭 활성화
tabItems.forEach((item) => item.classList.remove('active'));
tab.classList.add('active');
// 콘텐츠 활성화
tabContents.forEach((content) => content.classList.remove('active'));
const selectedCategory = categories[index];
document.getElementById(selectedCategory).classList.add('active');
});
});
}탭 & 메뉴 활성화 방법 : css에서 미리 설정한 active class로 현재 선택된 메뉴를 보여준다.
회고
html을 생성하는 방법은 여러가지가 있는데 이번 미션을 하면서 innerHTMl과 DOM 요소 직접 생성 방법에 대해서 더 알게된 사실이 있다.
단순히 둘 다 HTML을 생성한다고 생각했는데 innerHTML은 문자열로 HTML을 삽입하기 때문에 외부 입력을 그대로 반영할 경우 악성 스크립트가 실행될 수 있어 XSS 공격에 취약하고 DOM 요소를 직접 생성하는 방법은 데이터가 HTML 구조로 변환되는 과정을 명시적으로 제어하기 때문에 잠재적인 악성 스크립트가 삽입될 가능성을 줄여준다고 한다.
02 가위 바위 보 앱
GitHub : 02-rock-paper-scissors
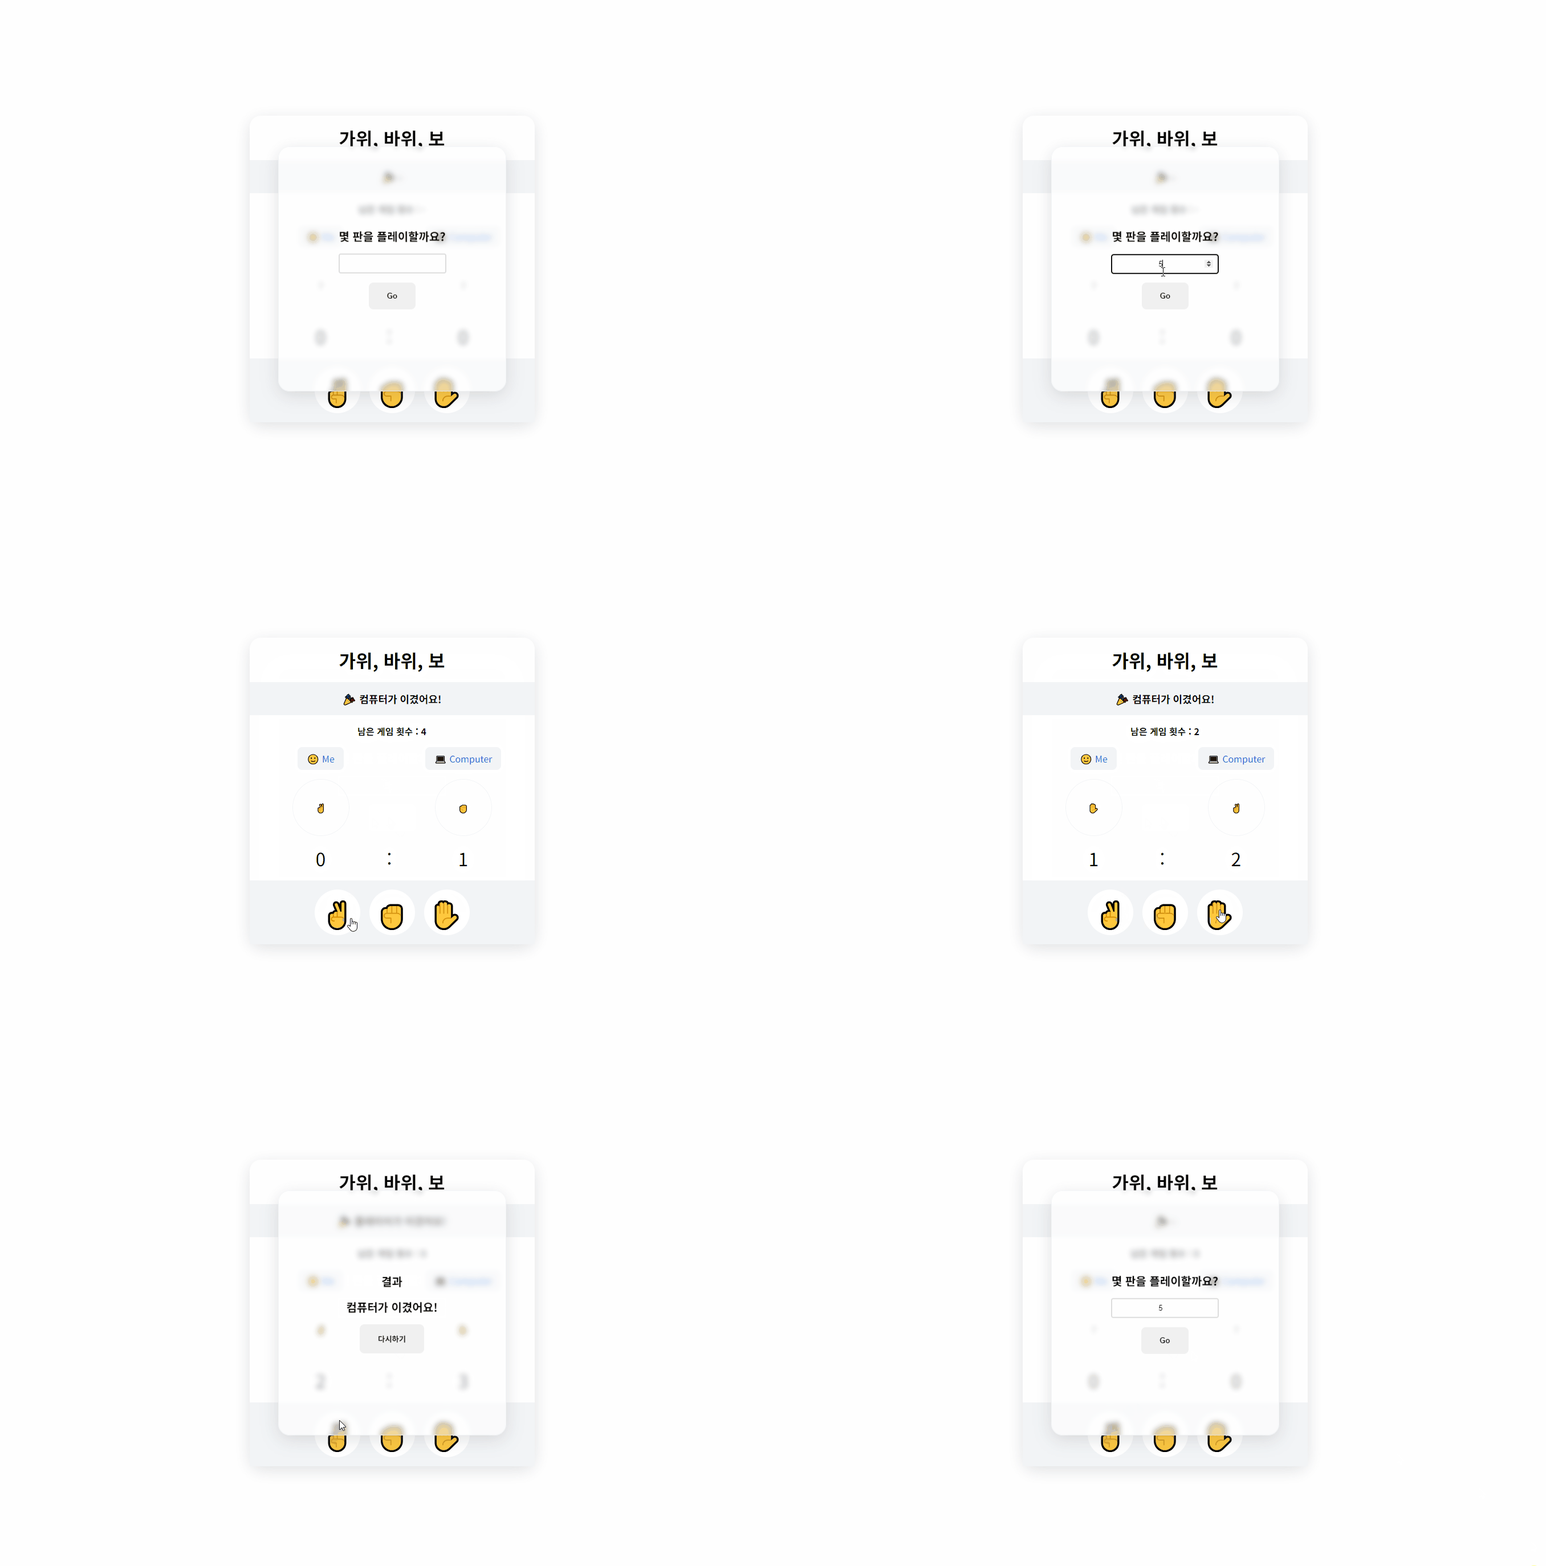 개요
개요
객체 및 DOM, Event 다루기 + 삼항 연산자 사용하기
필요한 기능
플레이어가 입력한 게임 횟수를 바탕으로 게임 시작하기
플레이어가 가위,바위,보 중 하나를 선택하면 컴퓨터가 랜덤으로 선택
최종 승리자 판별
게임이 끝난 후 다시 시작하기
구현
let win = [0, 0]; //플레이어와 컴퓨터의 승리 횟수
let remainingGames = 0; //남은 게임
const options = ['✌', '✊', '✋']; //컴퓨터가 무작위로 선택할 배열

//게임 초기화
const resetGame = () => {
  win = [0, 0];
  remainingGames = 0;
  playerMeWin.textContent = '0';
  playerComputerWin.textContent = '0';
  playerMeSelect.textContent = '?';
  playerComputerSelect.textContent = '?';
  gameCount.textContent = '0';
  gameResult.textContent = '-';
};
게임 상태 관리
const handlePlayerChoice = (playerChoice) => {
  return function () {
    const computerChoice = options[Math.floor(Math.random() * options.length)];
    playerMeSelect.textContent = playerChoice;
    playerComputerSelect.textContent = computerChoice;

    determineWinner(playerChoice, computerChoice);

    remainingGames--;
    gameCount.textContent = remainingGames;

    if (remainingGames === 0) {
      endGame();
    }
  };
};
플레이어가 가위, 바위, 보 중 하나를 선택하면 handlePlayerChoice() 함수를 호출하고 컴퓨터도 랜덤한 값을 선택하게 된다.
function determineWinner(player, computer) {
  gameResult.textContent =
    player === computer
      ? '무승부 입니다!'
      : (player === '✌' && computer === '✋') ||
        (player === '✊' && computer === '✌') ||
        (player === '✋' && computer === '✊')
      ? '플레이어가 이겼어요!'
      : '컴퓨터가 이겼어요!';

  gameResult.textContent.includes('플레이어')
    ? (win[0]++, (playerMeWin.textContent = win[0]))
    : gameResult.textContent.includes('컴퓨터') &&
      (win[1]++, (playerComputerWin.textContent = win[1]));
}
determineWinner() 함수에서는 플레이어와 컴퓨터의 선택값을 비교해 삼항연산자로 승패를 결정하고 승리한 쪽의 승리 횟수를 증가시키고 화면에 반영한다.
모든 게임이 끝나면 endGame(); 함수를 호출해 최종 승리 횟수를 비교하고 결과를 팝업을 통해 알려준다. 다시하기 버튼을 누르면 resetGame() 함수를 호출해 게임을 초기화 시키고 다시 시작할 수 있다.
회고
10번은 많아보여서 플레이어가 직접 게임 횟수를 정하는 기능도 추가해봤다. 컴퓨터와 플레이어 게임 횟수를 단순히 [0, 0] 이렇게 배열로 지정했는데 명확한 변수명으로 구분하는 것이 가독성 면에서는 더 좋을 것 같다.
03 퀴즈 앱
GitHub : 03-quiz
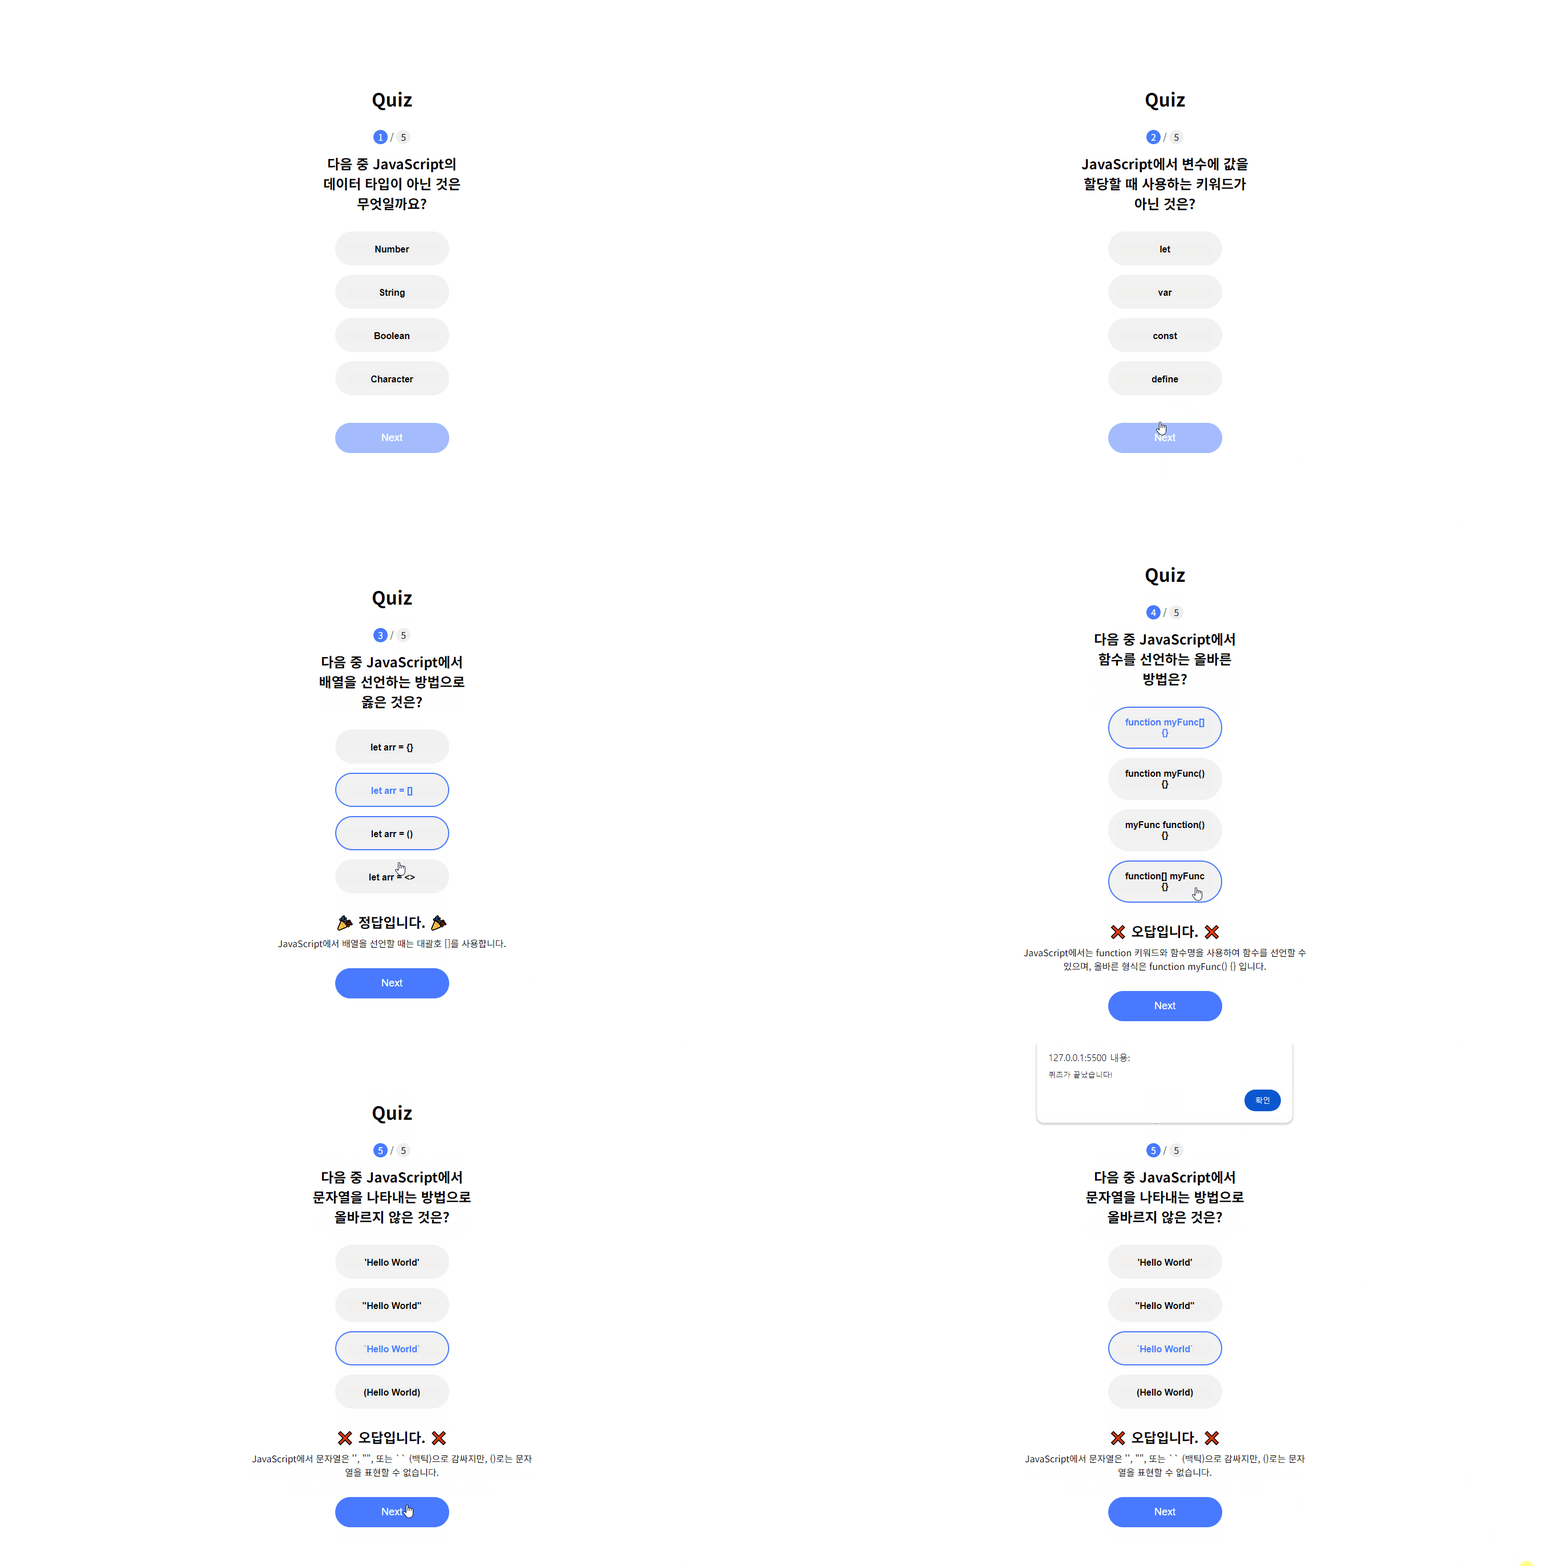 개요
개요
객체 및 DOM, Event 다루기
, Curry Function
필요한 기능
문제 1개씩 출력하기
문제 번호 보여주기
정답 확인 및 문제 설명 출력
Next 버튼 눌렀을 때 다음 문제로 이동
구현
data.js 파일에 필요한 데이터 정리
 {
    question: '다음 중 JavaScript의 데이터 타입이 아닌 것은 무엇일까요?',
    options: ['Number', 'String', 'Boolean', 'Character'],
    answer: 3, // Character
    explanation:
      'JavaScript의 기본 데이터 타입에는 Number, String, Boolean 등이 있지만, Character 타입은 존재하지 않습니다.',
  },
data.js에 문제들을 정리하고 이 데이터들을 바탕으로 DOM을 생성하여 문제를 보여준다.
const handleAnswer = (correctAnswer, explanation) => (selectAnswer) => {
  quizResult.classList.add('active');

  if (selectAnswer == correctAnswer) {
    quizMessage.textContent = '🎉 정답입니다. 🎉';
  } else {
    quizMessage.textContent = '❌ 오답입니다. ❌';
  }

  quizExplanation.textContent = explanation;
};

// 정답 선택
quizContainer.addEventListener('click', (event) => {
  if (event.target.tagName === 'BUTTON') {
    const answerItem = event.target.parentElement;
    const allAnswerItems = Array.from(answerItem.parentElement.children);

    const index = allAnswerItems.indexOf(answerItem);
    allAnswerItems.forEach((item) => item.classList.remove('active'));
    answerItem.classList.add('active');

    selectAnswer = index;

    // 정답 여부 확인
    const correctAnswer = quizQuestions[currentQuestionIndex].answer;
    const explanation = quizQuestions[currentQuestionIndex].explanation;

    const checkAnswer = handleAnswer(correctAnswer, explanation);
    checkAnswer(selectAnswer);

    nextButton.classList.add('active');
  }
});
handleAnswer(correctAnswer, explanation)에서 퀴즈의 정답과 설명을 받고 이후 선택된 답을 처리하고 정답 여부와 문제의 해설을 출력해준다.
회고
강의에서 들은 것을 잘 활용하고 이게 맞는지 잘 모르겠다.
추가해서 넣은 부분은 문제 총 갯수, 현재 풀고 있는 문제 번호 보여주기, 정답여부 보여줄 때 문제 해설도 같이 출력하기, 문제 답을 선택하기 전에는 button 비활성화 처리 선택 후 활성화하기가 있다. 문제 데이터를 더 많이 만들어서 문제를 랜덤으로 출력하고 정답률을 보여주는 부분을 추가해도 좋을 것 같다.
04 책 리스트 나열 앱
GitHub : 04-display-book-list
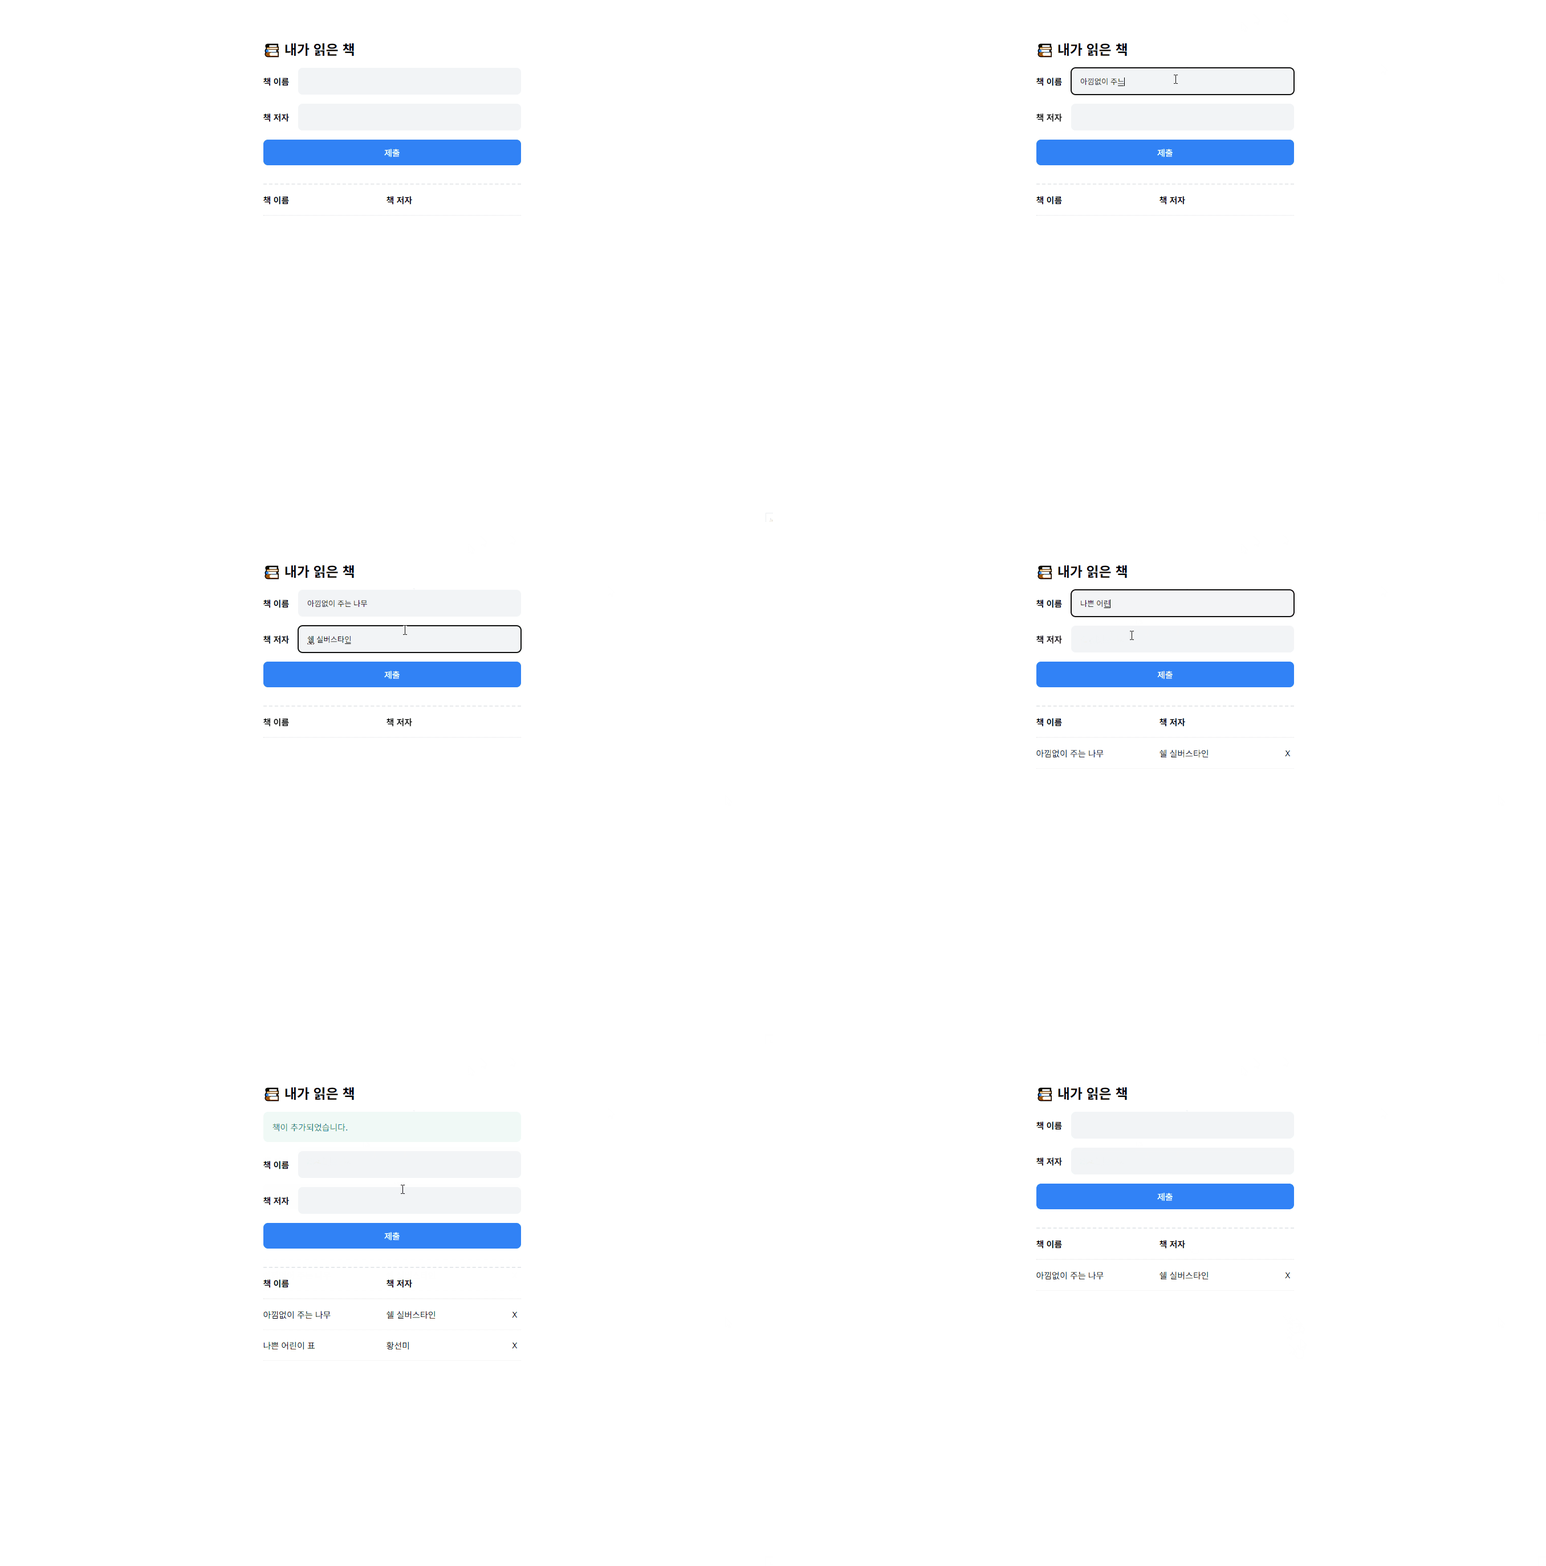 개요
개요
기능별 클래스와 메서드 사용하기
필요한 기능
책 리스트 추가
사용자가 값 입력 후 input 필드 초기화 하기
책이 추가&삭제될 때 메세지 1초 보여주기
구현
class BookManager 에서는 데이터를 추가,삭제하고 목록을 관리한다.
class BookUI {
 // constructor, init , showToast, handleDelete, createTableRow, handleAddBook 메서드 사용
}
class BookUI는 책을 추가하거나 삭제할때 이를 UI에 반영하고 이벤트를 처리한다.
 constructor() {
    this.bookTitle = document.querySelector('.book-title');
    this.bookAuthor = document.querySelector('.book-author');
    this.submitButton = document.querySelector('button.submit');
    this.tableTbody = document.querySelector('.table .tbody');
    this.toastsArea = document.querySelector('.toasts');

    this.bookManager = new BookManager();

    this.init();
  }
DOM 요소들을 선택하고 BookManager 인스턴스를 생성
init() {
    this.submitButton.addEventListener('click', this.handleAddBook.bind(this));
  }
사용자가 책을 추가하는 버튼을 누르면 handleAddBook 연결
handleAddBook() {
    const titleValue = this.bookTitle.value;
    const authorValue = this.bookAuthor.value;

    if (titleValue && authorValue) {
      this.bookManager.addBook(titleValue, authorValue);
      this.createTableRow(
        titleValue,
        authorValue,
        this.bookManager.getBooks().length - 1
      );

      this.showToast('add');

      this.bookTitle.value = '';
      this.bookAuthor.value = '';
    } else {
      alert('책 이름과 저자 모두 입력해야 합니다.');
    }
  }
BookManager class 에 책 추가
createTableRow 메서드에서 해당 값을 받아 책 이름 / 저자 / 행 삭제 버튼 UI를 만들어준다.
showToast 메서드를 통해 책 추가 메세지 출력하고 input 필드를 초기화 한다.
showToast(actionType) {
    const messageDiv = document.createElement('div');
    messageDiv.classList.add('toasts-message');

    if (actionType === 'add') {
      messageDiv.classList.add('add');
      messageDiv.textContent = '책이 추가되었습니다.';
    } else if (actionType === 'delete') {
      messageDiv.classList.add('delete');
      messageDiv.textContent = '책이 삭제되었습니다.';
    }

    this.toastsArea.appendChild(messageDiv);

    setTimeout(() => {
      this.toastsArea.removeChild(messageDiv);
    }, 1000);
  }
showToast 메서드는 현재 책이 추가된건지 삭제된건지 파라미터를 통해 받아 해당 메세지를 출력한다.
  handleDelete(button, rowElement, index) {
    button.addEventListener('click', () => {
      this.tableTbody.removeChild(rowElement);
      this.bookManager.removeBook(index);
      this.showToast('delete');
    });
  }
삭제 메서드에서는 delete를 전달해 책이 삭제되었다는 메세지를 출력한다.
회고
처음에는 생각 없이 앞에 했던 미션과 같은 흐름으로 코드를 작성했지만, 섹션 6, 7에 해당하는 미션이기 때문에 클래스로 구조를 변경했다. 익숙한 방식대로 작성하려는 경향이 있는 것 같다. 앞으로는 조금 더 생각하고 코드를 짜야겠다. 배운건 활용해야 하니까.
하나의 책임을 가지는 클래스와 명확한 역할을 수행하는 메서드를 쓰고 싶었는데 하나의 클래스에서 너무 많은 메서드를 썼나 싶다.
미션을 하는 건 재밌는데 이렇게 해도 되는 게 맞는가 하는 생각이 든다.
05 Github Finder앱
GitHub : 05-github-finder
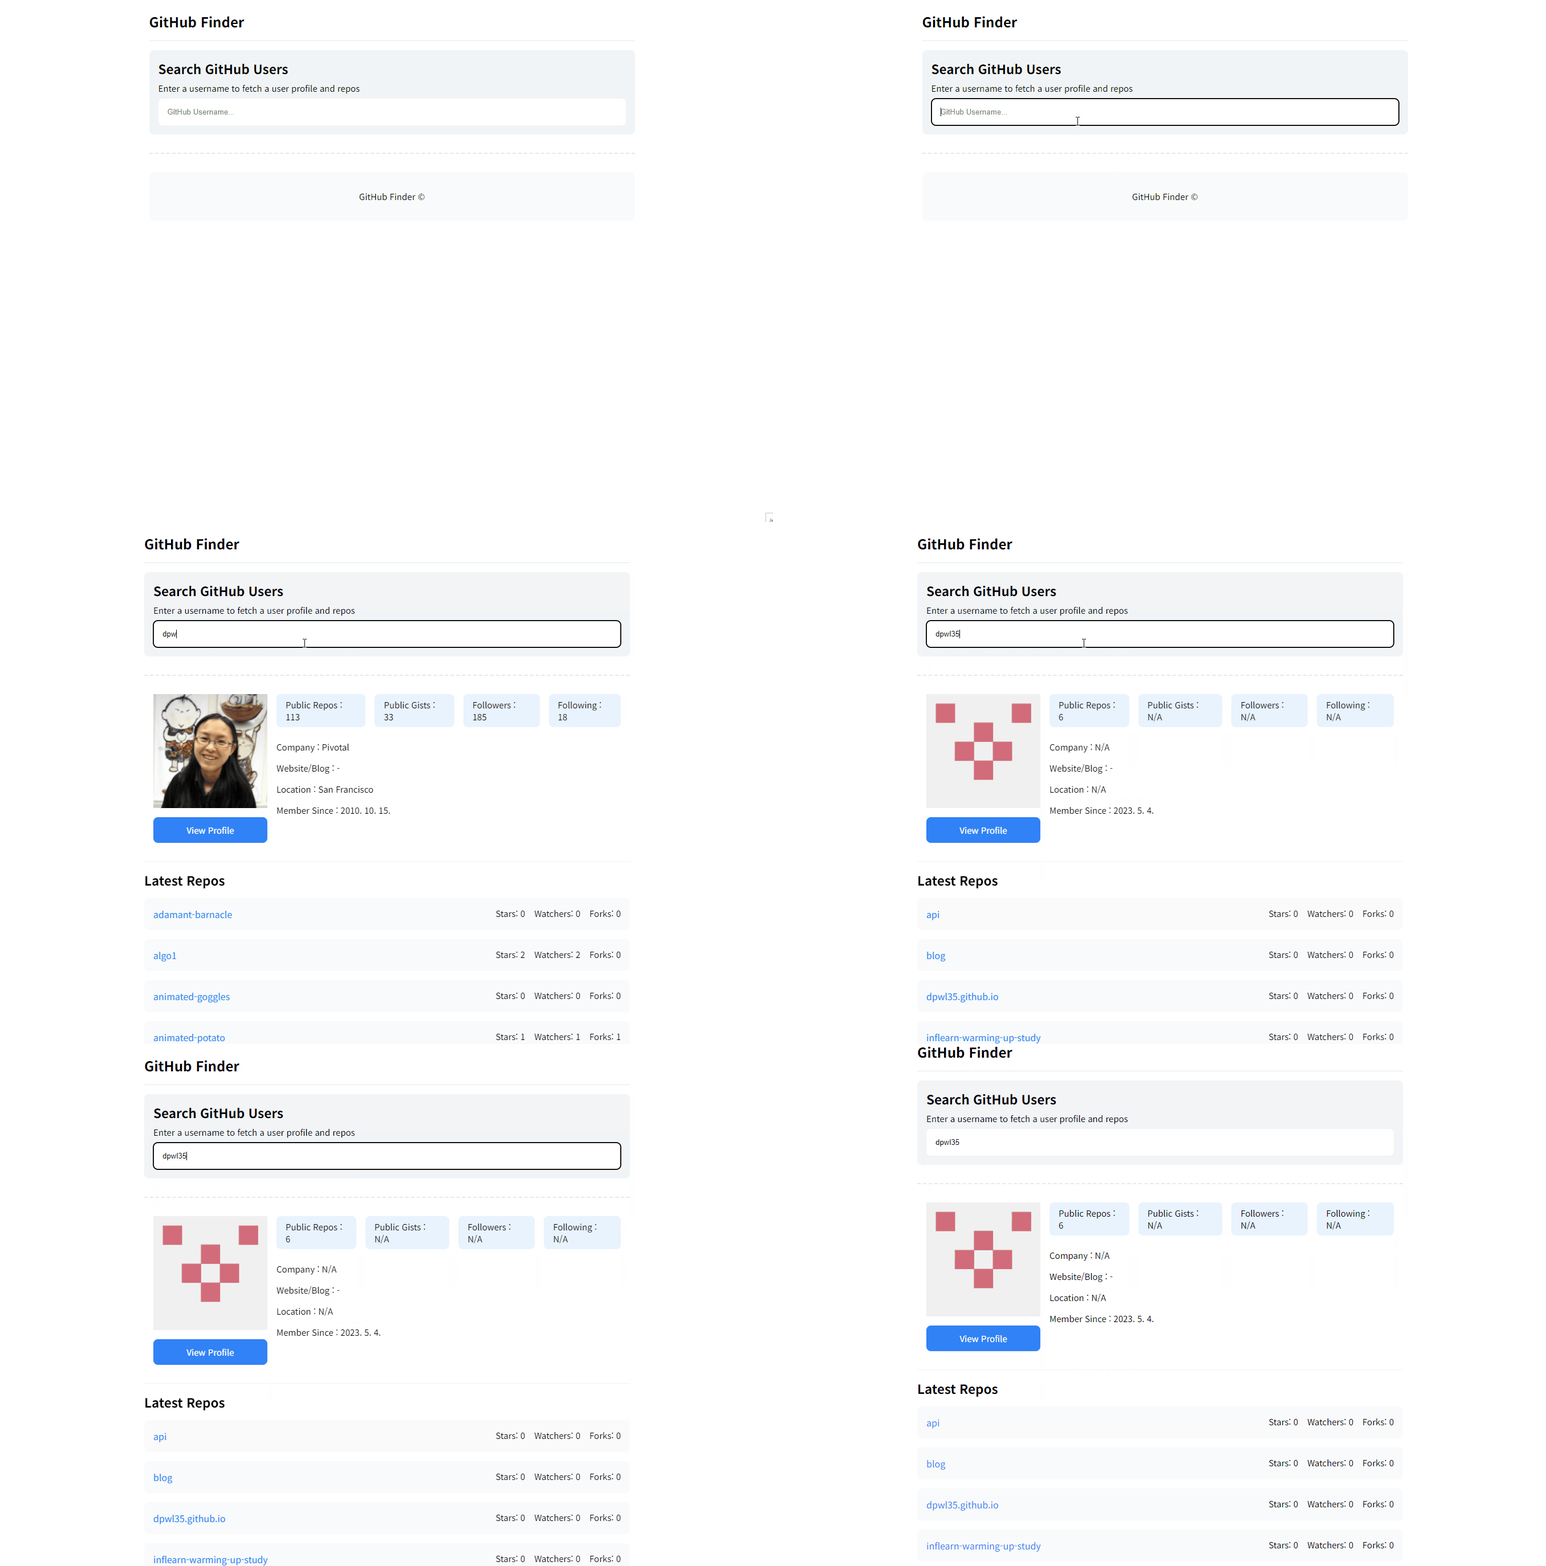
개요
API 사용하기, 비동기
필요한 기능
사용자가 input에 입력하는 값 실시간으로 받기
github API를 통해 유저 정보 보여주기
사용자 명(input 값)이 비어있을 때는 copyright를 보여줌
구현
userID.addEventListener('input', (event) => {
  const username = event.target.value.trim();

  if (username === '') {
    copyright.classList.add('active');
    user.classList.remove('active');
  } else {
    copyright.classList.remove('active');
    user.classList.add('active');
    getUserProfileAndRepos(username);
  }
});
유저 id에는 공백이 들어가지 않기 때문에 input에서 사용자가 실수로 입력한 공백은 삭제해준다. getUserProfileAndRepos()함수로 입력된 값을 전달.
async function getUserProfileAndRepos(username) {
 /*
 profileUrl , reposUrl 링크에서 username 받음
 블로그에서 자꾸 이상하게 입력되어서 코드는 아래에 따로 뺐다.
*/

  try {
    const [profileResponse, reposResponse] = await Promise.all([
      fetch(profileUrl),
      fetch(reposUrl),
    ]);

    if (profileResponse.ok && reposResponse.ok) {
      const profileData = await profileResponse.json();
      const reposData = await reposResponse.json();

      userImageElement(
        '.user-profile-img img',
        profileData.avatar_url,
        profileData.login
      );
      userTextElement('.user-profile-link', profileData.html_url, true);

      userTextElement('.user-repos span', profileData.public_repos);
      userTextElement('.user-gists span', profileData.public_gists);
      userTextElement('.user-followers span', profileData.followers);
      userTextElement('.user-following span', profileData.following);
      userTextElement('.user-company span', profileData.company);
      userTextElement('.user-website span', profileData.blog);
      userTextElement('.user-location span', profileData.location);
      userTextElement(
        '.user-member span',
        new Date(profileData.created_at).toLocaleDateString()
      );

      // 저장소 목록 최대 4개
      projectArea.innerHTML = '';

      reposData.slice(0, 4).forEach((repo) => {
        const projectElement = createProjectListElement(repo);
        projectArea.appendChild(projectElement);
      });
    } else {
      handleError();
    }
  } catch (error) {
    handleError();
  }
}
const profileUrl = https://api.github.com/users/${username};
const reposUrl = https://api.github.com/users/${username}/repos;
Promise.all()을 사용해 프로필 정보와 저장소 목록을 동시에 요청한다. response.ok를 통해 두 요청이 모두 성공했는지 확인하고 .json() 메서드를 호출해 응답된 값을 자바스크립트에서 사용 가능하도록 JSON 형식에서 자바스크립트 객체로 변환해준다.
요청이 실패하면 handleError()가 호출되어 에러 메세지가 표시된다. handleError() 함수에는 사용자 정보를 보여주는 UI를 초기화 하는 clearUserProfileAndProjects()함수와 User not found 메세지를 출력하는 toggleActiveClass() 함수가 들어있어 두 함수가 같이 호출된다.
function userTextElement(selector, value, isLink = false) {
  const element = document.querySelector(selector);
  if (element) {
    if (isLink) {
      element.href = value;
    } else {
      element.textContent = value || 'N/A';
    }
  }
}

function userImageElement(selector, src, alt) {
  const image = document.querySelector(selector);
  if (image) {
    image.src = src;
    image.alt = alt;
  }
}
유저의 저장소 목록이 몇 개 있을지 모르기 때문에 하단의 저장소 목록은 createProjectListElement() 함수를 통해 데이터를 전달 받아 DOM을 생성해 보여주고 상단의 유저 정보는 미리 생성된 el에 값을 넣어 보여준다.
유저 정보를 보여주기 위해 불러오는 document가 많아서 어떤 곳에 어떤 값이 들어가는지 한눈에 보고 싶어서 userTextElement()와 userImageElement() 함수를 만들고 userTextElement('.user-repos span', profileData.public_repos); 이런식으로 코드를 써봤다.
회고
깃허브 API는 비인증 요청의 경우 시간당 60회 요청이 가능하기 때문에 따로 토큰 발급 받는 부분은 생략했다. API를 사용해 데이터를 받아 보여주는 작업이 재미있었다.
주차 회고와 미션에 대한 내용을 같이 쓰다보니 글이 길어졌다. 다음 미션도 힘내서 해야겠다. 🙂
댓글을 작성해보세요.
